If you’re a Strava user, then you would always wish to connect your fitness devices to it. And one such fitness device is Whoop Strap. The innovative product Whoop has been designed to help people lose weight, increase strength and stamina, improve their moods, reduce stress levels, and much more.
Connecting Whoop with Strava is a great way to track workouts, monitor fitness goals, and improve performance. By syncing these two apps together you can see your workout stats on both platforms and get a more detailed analysis of how you’re progressing.
This guide walks you through the steps for connecting your Strava account to Whoop to gain better insights. However, first, let’s see if Whoop officially supports Strava integration.
Table of Contents
Does Whoop Work with Strava?
Fortunately, WHOOP members can now enable one-way integration to upload WHOOP activities to Strava. On a successful connection, Whoop syncs all future activities, including heart rate data, GPS route, and Whoop metrics to your Strava account.
How to Connect Whoop to Strava? (Quick Walkthrough)
Before you connect Whoop to Strava, make sure you have installed both apps and signed up for accounts on it. Assuming that you’ve done these prerequisites, let’s continue with the steps below:
Step 1: Open the Whoop App
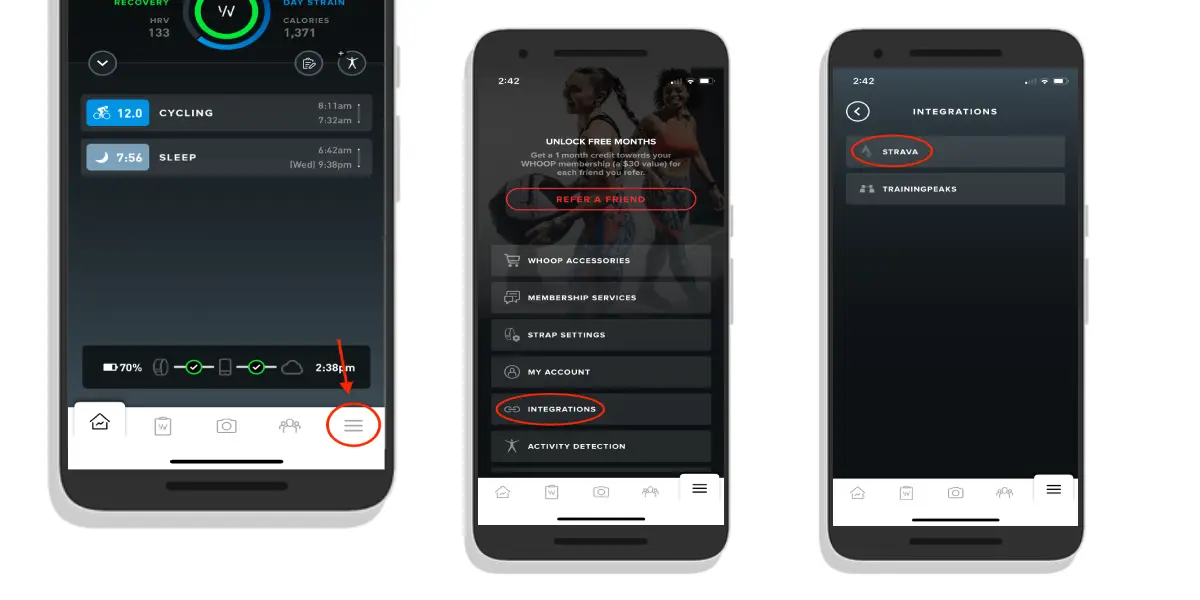
To begin, you have to locate the integration option on your Whoop app. Open the Whoop app > Tap on the “three bars” icon on the right corner > select “Integrations.”
You’ll find a list of apps that can be connected to the Whoop.
Step 2: Connect Whoop to Strava Account
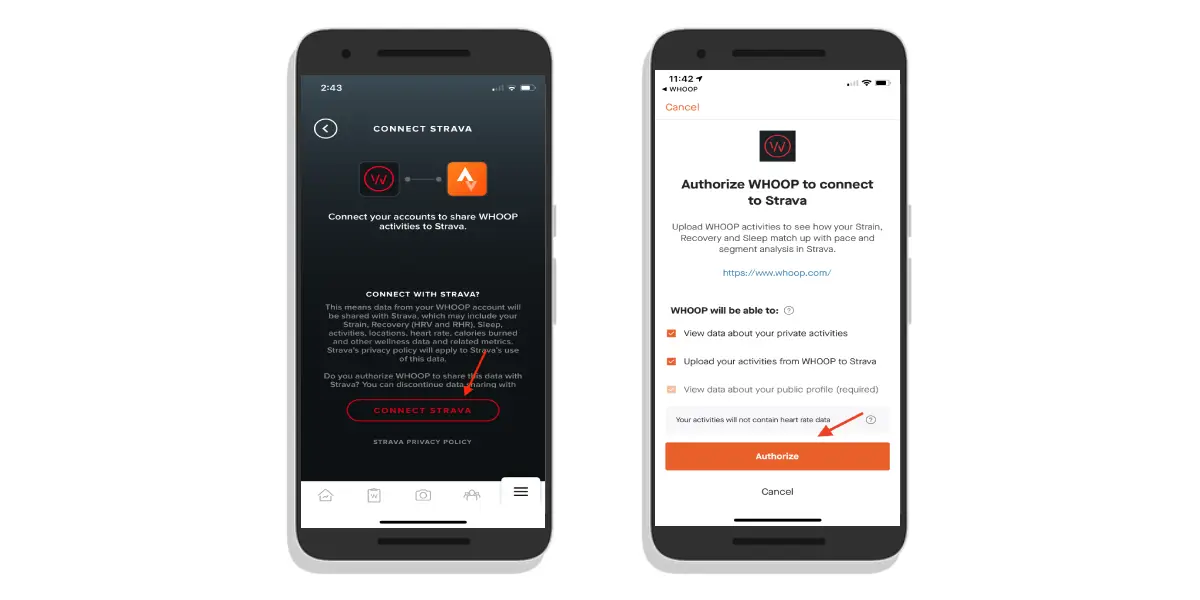
From the list, select Strava. On selecting, you’ll be prompted to authorize permission to connect your Whoop to Strava. Tap on “Connect Strava.”
You’ll be then redirected to Strava app for authorizing Whoop to connect to Strava. In case you don’t have the Strava app installed, you’ll be redirected to the Strava web app to complete the process.
Make sure you checkmark all necessary fields. And tap “Authorize.”
Step 3: Select Activities you Want to Sync
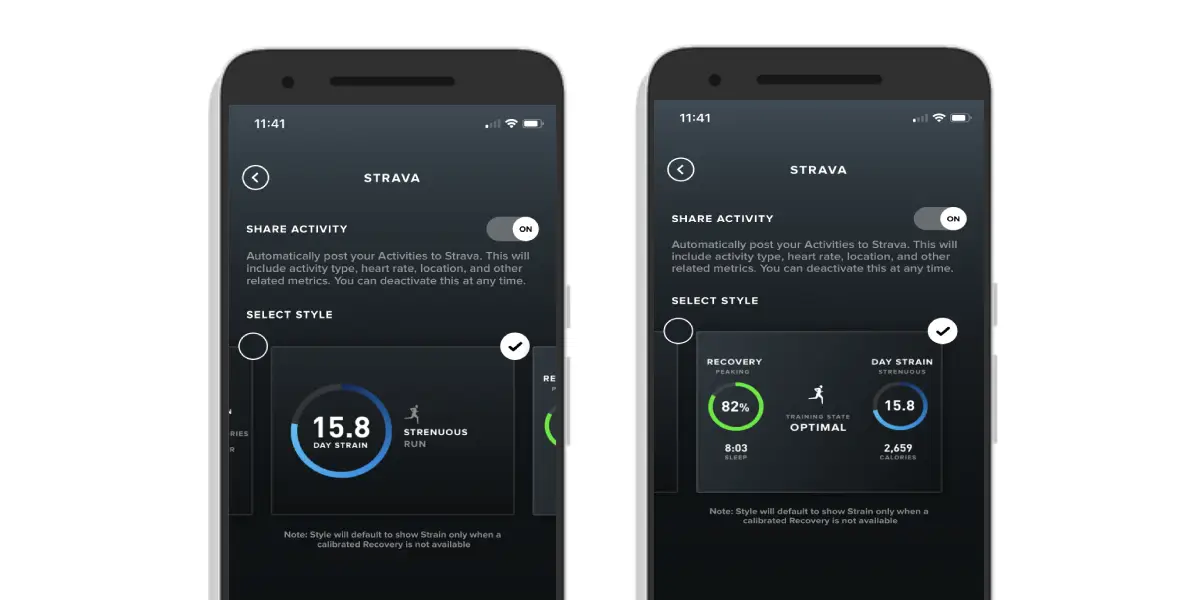
On a successful connection, you can choose which WHOOP data and metrics to display alongside your activity. Select the style according to your preference.
Step 4: It’s Done! Start Syncing
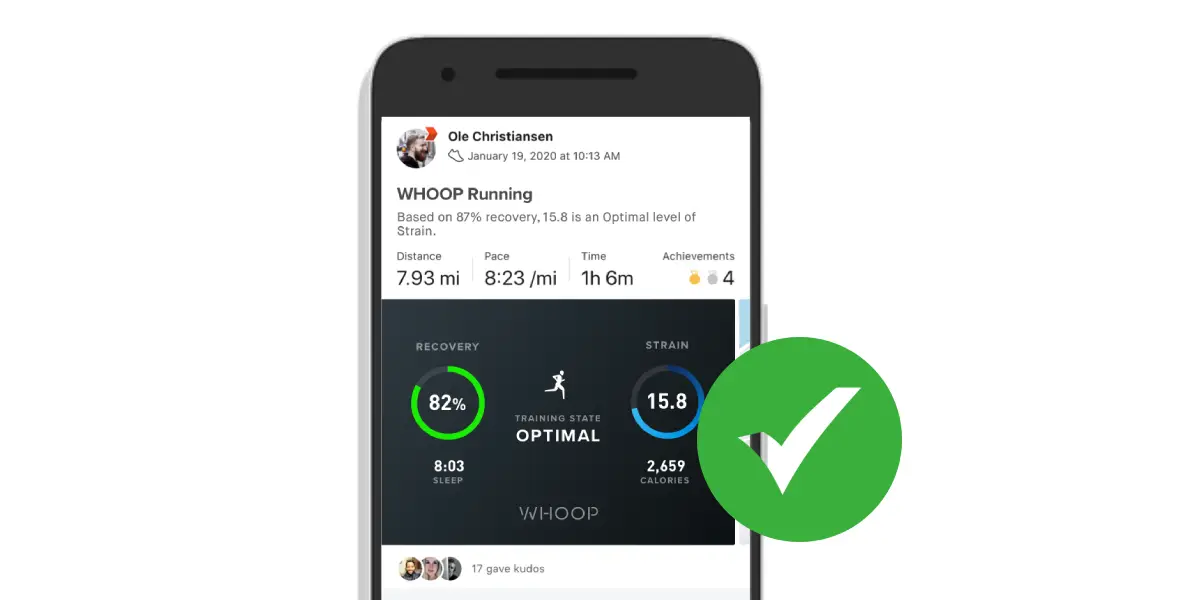
Congrats! Now you’ve successfully connected your Whoop to your Strava account. All your future data, including heart rate, GPS route, and other Whoop metrics will automatically sync to your Strava.
How to Use Whoop As A Heart Rate Monitor for Strava?
You’ll be more excited to know that your Whoop strap can be used as a Bluetooth heart rate monitor for broadcasting your heart rate data to the Strava app.
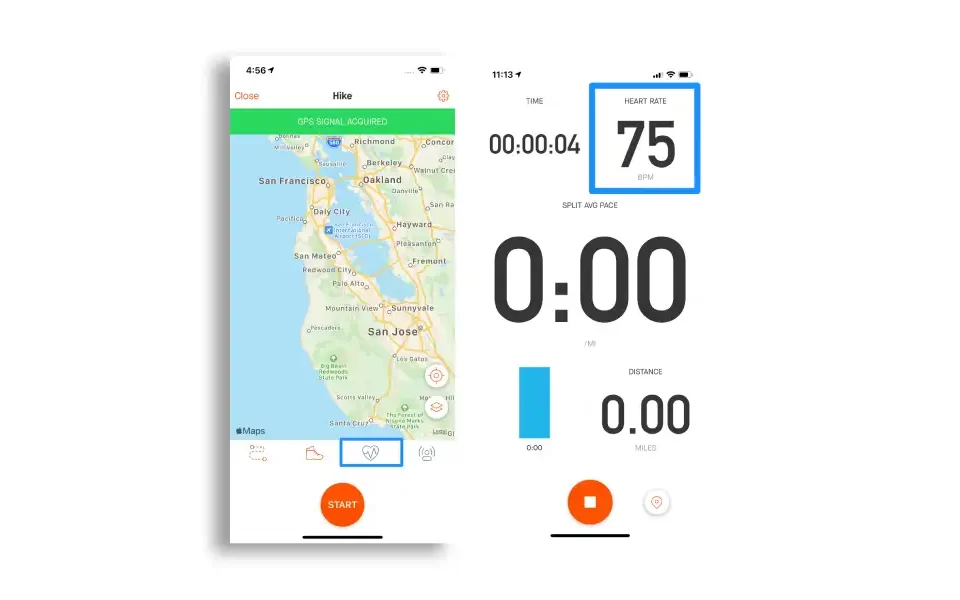
To set this up, follow the steps below:
- On the Whoop app, Go to settings > Strap Settings > turn HR Broadcast on.
- Now open Strava, and tap on Record from the navigation bar present below.
- You can either tap the heart rate icon below or select the gear icon in the upper right corner and Heart Rate Sensor on the following screen. The app will start searching for nearby sensors.
- Once your Whoop device appears, tap on it to connect.
- You can now view your heart rate tracked by your Whoop strap in real-time while you record.
Why Broadcast Heart Rate from an External Sensor to Strava?
One reason is that you may be wearing a chest strap or tracker like Whoop for your heart rate and need to broadcast it for some analysis or training purposes.
Another reason is that you may have a power meter with an optical sensor and want to use the data for Strava, or just want to broadcast it so you can see your power on Strava.
Tips to Fix Whoop & Strava Sync Issues
Complete the Required Criteria
New members may experience “404” errors when trying to initiate the Strava and Whoop integration. This happens when you have not completed the required criteria of the initial 4-day calibration period and unlocked Strain Coach on day 5.
This means new members should wait for four days to let the strap calibrate their body. During this period, do not remove the strap. And next, unlock Strain Coach on day five. Once completing these criteria, you’ll be able to integrate your Whoop with your Strava account.
Leave Strava’s Beta Program (Android Users)
You are probably using Strava’s beta version, which is causing a “Something Went Wrong” error while authorizing the connection. To fix this, you’ll need to leave the beta program and reinstall the Strava app. Or, use the Strava web app to complete the process.
Here’s how to leave Strava Beta Program:
- To leave the beta program, Open Google Play > Strava > Leave. Then, reinstall the Strava app.
Note: Once the connection process was successful, you may rejoin the beta program if you want.
FAQs On Whoop & Strava Integration
How to Auto-Upload My Whoop Heart Rate Data to Strava?
By default, automatic uploads for heart rate data are disabled. To enable, Open Strava app > Go to Profile > Settings > Data Permissions > Health Related Data > Enable it. Once you enable this, your Whoop’s heart rate data along with activities starts syncing to the Strava app.
How to Upload My Whoop GPS Route to Strava?
You will need to track your activities with Strain Coach and toggle on “Track Route” before uploading your GPS route. Strain Coach will show you your route using the GPS signal from your phone after you select “Start Activity.”
Can Strava Activities Sync to Whoop App?
Currently, you can only sync activities from Whoop to Strava. Strava cannot push information to WHOOP.
How to Disable Automatic Uploads?
To disable Whoop’s automatic uploads to Strava, Open the Whoop app > Go to Menu > Select Integrations > Strava > Turn off the “Share Activity” option.
Read More On Whoop Straps

